A BIOS to UEFI Transformation
Originally written: 6/24/2011; last update: 5/1/2012
I'm a technical writer and consultant specializing in Linux
technologies. This Web page is provided free of charge and with no annoying
outside ads; however, I did take time to prepare it, and Web hosting does
cost money. If you find this Web page useful, please consider making a
small donation to help keep this site up and running. Thanks!
| Donate $1.00 |
Donate $2.50 |
Donate $5.00 |
Donate $10.00 |
Donate another amount |
|
|
|
|
|
|
You've heard of the Extensible Firmware Interface (EFI) and the Unified
EFI (UEFI), and you're curious. Perhaps you're even desperate: You know
that UEFI is the key to booting Windows on a disk larger than 2 TiB, but
your computer uses the old-style Basic Input/Output System (BIOS). Perhaps
you're in-between: You're fed up with the Master Boot Record (MBR)
partitioning system, but you can't get Windows to boot from a new GUID
Partition Table (GPT) disk on your BIOS-based computer. In any of these
cases, you may be interested in exploring a way to turn a BIOS-based
computer into one that at least seems like it's built atop UEFI. This
article outlines how to do this, beginning with some background
information, steps needed to set up the software, using the software, and
some final words about problems and possible workarounds to them.
Be aware that the tools and techniques I describe on this Web page are
highly experimental. The software might not work at all; in fact, it
could endanger your data! The software works more reliably on Intel CPUs
than on AMD models. If you do get it working, it's likely to be at the cost
of some hairs pulled from your head. It won't work as well as a real
UEFI-based computer, so if you've got the cash, you're better off upgrading
your computer if you really need UEFI. If it sounds like I'm trying to
scare you off, to a certain extent you're right. Following the advice on
this page is not for most people. If you're technically inclined,
sufficiently motivated, and up for an adventure, though, read on!
One final caveat: I'm a Linux person, and some of the preparatory tools
described here are built around Linux. If you don't know Linux, you can
still proceed, either finding other ways to do things or using Linux
on an optical disc or USB flash drive (I offer some specific
recommendations later).
Bridging the Gap
UEFI is the next generation of firmware for PCs. Macs already use the
related but slightly older EFI, and most motherboards and computers
introduced since mid-2011 are based on UEFI—even many that aren't
advertised as such use UEFI, although they often use a BIOS compatibility
layer by default. (Some are even built with a BIOS core and use UEFI as an
add-on stored in the firmware.)
If your computer is based on a true BIOS, though, how can you make it
act like a UEFI-based system? The answer is to use a disk-loaded UEFI
implementation known as the Developer's UEFI Environment
(DUET; or sometimes UEFI DUET). This software is a real,
although limited, UEFI implementation that can be booted like an OS from a
computer's hard disk. Once it's in control, DUET provides typical UEFI
services to UEFI-based boot loaders and OSes. This sounds straightforward
enough, but there are hurdles to be overcome:
- DUET has historically been used by UEFI developers; it's not
really an end-user product. Most importantly, it's available in source
code form from its
Sourceforge Web page, but easy-to-install binary packages have been
impossible to come by until recently. (In fact, even today, "easy to
install" may be stretching matters a bit.) Download links for the
(relatively) easy-to-install stuff appear later, in Preparing to Use DUET.
- DUET currently lacks support for common optical disc filesystems
(ISO-9660 and UDF). This doesn't prevent you from installing an OS,
perhaps even from such a disc; but some installers lack the necessary
El Torito boot files to boot with DUET, and some may fail to boot
for unknown reasons. This is true of the Windows 7 installation disc,
for instance.
- On some systems, DUET fails to detect optical discs, even if they
contain appropriate El Torito boot files or if you've loaded an
ISO-9660 driver. This happens with the laptop computer on which I did
most of my initial testing, for instance. If you run into this problem,
you'll need to copy at least the initial OS boot files to a USB flash
drive or hard disk to start an OS installation.
- DUET requires a series of boot loaders to boot. The software has
traditionally been booted from floppy disks or USB flash drives, but
it's now possible to install it to boot from a hard disk.
- Existing OS installations may not work if you try to boot them using
DUET (or if you switch boot modes on a UEFI motherboard, for that
matter). Some, such as Linux, can be fairly easily set up to boot
either way. Others, such as Windows, have awkward conversion
procedures.
- Some computers don't work with DUET. Most importantly, it's really
only useful on 64-bit x86-64 computers, especially in binary
form. In fact, it doesn't start up properly even on some x86-64
computers. In tests on five x86-64 systems, I managed to get one
or both versions working on just three computers—a pretty dismal
success rate, really. It may just be coincidence, but the two computers
that worked best for me used Intel CPUs, whereas the two that worked
worst and the one that worked with version 2.1 but not version 2.3 all
had AMD CPUs.
- Many OSes have limited or no UEFI support. Windows can install pretty
easily using UEFI, but support in Linux is spotty (but improving). I
haven't tried FreeBSD yet, but I understand it's got pretty weak UEFI
support. Really, your best reason for running DUET is to use
Windows or a Windows/Linux dual-boot. (Hackintosh configurations are
another matter, and another can of worms! I don't cover them here.)
Because of these limitations, I recommend proceeding slowly with DUET.
Installing the software to a USB flash drive or a spare hard disk will
enable you to test if the software will boot at all. If it doesn't, you can
abandon the project without wasting too much time or endangering your
existing installations. If DUET boots, you should do a test installation or
two to a spare hard disk before performing a "real" installation. That way,
if you run into problems, you'll know what they are and can either learn
how to work around them or stop before you endanger your existing OS
installations.
There are several ways to configure a computer to use DUET. You can
use it for some or all of your computer's OSes. For instance, you might use
DUET to boot Windows from a GPT disk, but leave Linux booting in BIOS
mode, since it can boot fine from a GPT disk even on a BIOS-based computer.
You can boot DUET from a hard disk or from a USB flash drive. If you
use it to boot Windows, you should be aware that Windows must be installed
to a GPT disk when you use UEFI (including DUET)—but that may be
the point of using DUET! If you have more than one disk, you can mix
GPT and MBR disks.
Preparing to Use DUET
So, are you ready to proceed? You'll have to download several items. All
of them are open source software, with the exception of Windows if you
decide to install it. The list is:
- SYSLINUX—This
is the first of the boot loaders you need to boot DUET. (You must
follow a few links from the main page to get to the download
page. The download package includes both source code and binaries.)
SYSLINUX resides in the MBR, meaning that it's the first boot loader to
be called. In fact, several other boot loaders can be substituted for
SYSLINUX, and if you want DUET to be just one method you use for
booting from a hard disk, you might want to use another one, such as GRUB. The "Managing the Boot Process" section briefly
describes some possibilities.
- BootDuet—This is the second of two boot loaders you'll
need to boot DUET. BootDuet installs in a partition boot record
(PBR)—that is, at the start of a disk partition. This link is a source code
package. The DUET package described next includes compiled
BootDuet binaries in its BootSector subdirectory, so you don't really
need to download BootDuet separately.
- DUET
itself—That link is to a page with a binary build of the
package. Click the "Download master as tar.gz" link on the right side
of the page. This link also includes the BootDuet code and various
installation scripts.
- A working Linux installation—The instructions I provide
here are based on Linux. If you don't know much about Linux, you'll
have a harder time proceeding, but you should be able to muddle
through. You can use a Linux emergency disc, such as Parted Magic, System Rescue CD, or RIP
Linux, to do the Linux-specific tasks. I used version Parted Magic
6.1 as a model when writing these instructions. Since then, the Parted
Magic maintainers have changed to a date-based numbering scheme.
Version 2012_04_21 (the latest as I write this revision) is virtually
identical in the features that are important for purposes of this Web
page. It's also possible to install DUET without using Linux at
all, but it becomes more tedious because a critical installation tool,
duet-install, is a Linux-only script. Without
duet-install, you'll need to read the documentation for
SYSLINUX, BootDuet, and DUET and install each package manually.
- At least one UEFI-capable OS—There's not much point in
running DUET unless you've got an OS to install on it. Among the
numerous Linux distributions I've tried on DUET and "real" UEFI
computers, Fedora has given me
the fewest problems, although it's still a bit rough. Windows, as noted
earlier, installs pretty easily on a UEFI system. Be sure to get a
64-bit version of your OS, though. One of the limitations of UEFI is
that it's difficult, and sometimes impossible, to install a 32-bit OS
on a 64-bit CPU; and because there are few 32-bit UEFI implementations
for x86, few OS vendors support UEFI installation in their
32-bit OSes. Certainly Microsoft doesn't.
In addition to the software, you'll need some hardware items:
- A 64-bit computer—Specifically, something that uses an
x86-64 (aka AMD64 or EM64T) CPU. Most desktop and laptop PCs
sold since around 2007 qualify.
- OS disk space—At a minimum, you'll need your computer's main
hard disk. Experimenting in this way is risky, though, so I recommend
you use a spare hard disk. A USB flash drive or similar external
storage can be sufficient to boot DUET, which consumes only about
1.7 MiB, but if a preliminary test with DUET alone is successful,
you'll presumably want to install an OS, and you'll need more space for
that.
- USB flash drives—Although you can sometimes get by without
using one, USB flash drives are very handy for holding your initial
test DUET installations and perhaps for holding copies of your OS
installers. This is especially true if DUET fails to detect discs
in your optical drive or if your OS fails to boot from it. Some OS
installers will fit on a 4 GB or even a 1 GB drive, but others may
require as much as 8 GB of space.
The ideal situation is to have two computers and one or two USB flash
drives. You leave one computer untouched and use another one, with no
valuable data on its hard disk, for experimentation. You can use the main
computer to create different DUET configurations as OS installers on
the USB flash drives, which you then use on the test computer. When you
find something that works, you can install DUET on the test computer,
removing the USB flash drives from the equation. If you've got just one
computer, but have a spare hard disk, you can unplug your regular disk for
safety and use a Parted Magic disc to set up the spare hard disk directly
and test its ability to boot.
If you like virtual machines, you might be tempted to use one for
testing. This may work with some, but I've had no luck with DUET and
VirtualBox. This isn't so bad, really, since VirtualBox has its own UEFI
implementation. It can't boot Windows, though. I don't know how DUET
fares with VMWare, QEMU, or other virtual environments.
Installing DUET
The following instructions assume that you've got a computer with a
completely blank hard disk (meaning one with no data you care about). If
this is your regular computer and you're using a spare disk for testing,
you should prepare a few things before you begin:
- Burn Parted Magic to a blank CD-R. (Alternatively, you can use a Linux
installation on another computer, as noted above.)
- Unpack the .tar.gz or .zip file you downloaded for
SYSLINUX. It should extract into its own directory. If you're using a
regular Linux installation, you can instead install its own SYSLINUX
package, in which case you should use your package system to figure out
where its binary files are installed.
- Unpack the DUET tarball you downloaded. It should extract into its
own directory
(tianocore_uefi_duet_builds-tianocore_uefi_duet_installer as I
type; but its maintainer has changed the name in the past, so it may be
something else for you).
- Copy the SYSLINUX and DUET directories to a USB flash drive.
(Alternatively, you can use a regular Linux installation on another
computer and use the USB flash drive as a target for the DUET
installation.)
With these preliminaries out of the way, you can begin:
- Unplug any external disk devices from your target system, including
USB flash drives. They'll only confuse matters, and may be at risk of
damage should you mistakenly write data to one of them. If you want to
do an initial install of DUET to a USB flash drive, though, you
should leave that one target drive plugged in.
- Boot Parted Magic on your test system. At the boot loader menu, select
the option, "Default Settings (Runs from RAM)."
- Double-click the Partition Editor icon on the left side of the screen.
This launches the GParted partitioning software. The resulting window
resembles Figure 1. Warning: See the "Troubleshooting Problems" section for an
important caveat concerning subsequent uses of GParted.
Figure 1. GParted is a flexible Linux partitioning tool

- If your computer has more than one hard disk or if you have any
removable disks plugged in, select the one you want to use for testing
from the button near the top-right corner of the screen. (It reads
/dev/sda (55.89 GiB) in Figure 1.) Note the name (/dev/sda, /dev/sdb,
etc.) of the device; you'll need it later.
- Select Device -> Create Partition Table from the GParted window. A
dialog box appears.
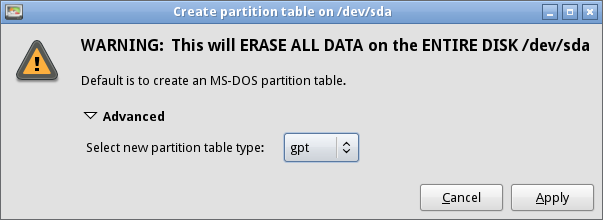
- Expand the Advanced item and select GPT as the partition table type, as
shown in Figure 2. Heed the warning in the dialog box; if your disk has
any data you want to save, click Cancel and rethink your plan. Note
that it is possible to convert a disk from MBR to GPT form
non-destructively using my GPT fdisk (gdisk,
cgdisk, and sgdisk) software; however, the disk
will be non-bootable immediately after the conversion. Experimenting
with DUET on your hard disk is risky, so try such a conversion
only if you're desperate and if you understand that you may have to
re-install your boot OS. I don't describe such conversions on this
page.
Figure 2. To prepare a disk for UEFI use, it's best if
it's partitioned as a GPT disk.
- Click Apply to create a new GPT on the disk.
- Right-click in the large unallocated space and select New from the
pop-up menu. You'll see a Create New Partition dialog box, as in Figure
3. You'll now create an ESP that will both hold your DUET software
and function as the ESP for the UEFI and your installed OSes.
Figure 3. GParted enables you to enter new partition
data in several ways.
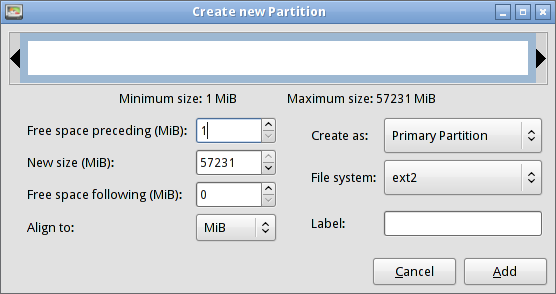
- Set the New Size (MiB) field to something between 100 and 500. Make it
on the large side of this range if you expect to install multiple Linux
distributions and use ELILO or the kernel's EFI stub loader, since then
you may need to store your Linux kernels on the ESP. For most other
purposes, something between 100 MiB and 200 MiB should be fine. If you
change the value by typing it, click in another space field to be sure
they update correctly.
- Set File System to FAT32. Note that Windows 7 requires FAT32, not
FAT16, in its ESP, so be sure to get the FAT type right! (On the other
hand, Ubuntu creates a FAT16 ESP—but that's a serious flaw that
argues strongly for installing Ubuntu in BIOS mode rather than in UEFI
mode.)
- If desired, type a name into the Label field. This will show up in
some tools and can help you identify your partition.
- Click Add. Your new partition will appear in the display, but it won't
actually be created.
- Click Apply to create the partition. GParted displays a dialog box
asking for confirmation; click Apply. After a moment, you should see a
notice that the operation completed. Dismiss it.
- Note the partition name in the list (on the left of the display). It
will probably be /dev/sda1. If there's a triangle with an exclamation
mark in it, don't worry; GParted just can't detect the filesystem, but
it will be created later.
- Right-click the partition you just created and select Manage Flags. A
dialog box like the one in Figure 4 will appear.
Figure 4. GParted identifies the ESP by the 'boot'
flag.

- Select the "boot" flag, as shown in Figure 4, and click Close.
Unfortunately, GParted uses the same terminology ("boot flag") to
identify an ESP on GPT disks as it does to identify the bootable
partition on an MBR disk. The two concepts aren't very closely related,
but we're stuck with the choices of the GParted developers.
- Click Apply in the main window to write this change to disk.
- You can optionally create partitions for your OS installation in a
similar manner; however, you must be careful, since some OSes have
specific requirements. As a general rule, it's best to let the OS
installer create its own partitions.
- Select GParted -> Quit to exit from the program.
- Click the icon of a computer monitor. This opens an LXTerminal window,
as shown in Figure 5.
Figure 5. LXTerminal is Parted Magic's command prompt;
it lets you type commands to do unusual or complex things.
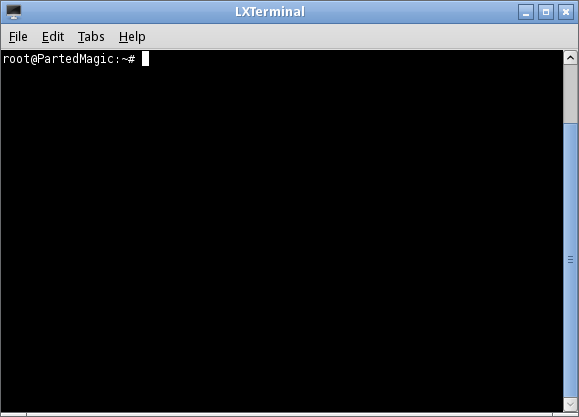
- Type ls /dev/sd* in the LXTerminal window.
(Note that those are forward slashes, /, not backward slashes,
\, as Windows uses.) The result is a list of filenames
associated with disk devices. If you've got just one disk, it will
contain /dev/sda (the whole hard disk), /dev/sda1
(the partition you created), and possibly /dev/sda2 and above
if you created additional partitions. Take note of the disks and
partitions that are present.
- Insert your USB flash drive with the DUET and SYSLINUX software
and wait a few moments.
- Type ls /dev/sd* again. You should see the
entries you saw before plus one or two more. The whole-disk device
(/dev/sdb, probably) is your USB flash drive. If there's a
partition entry, such as /dev/sdb1, that represents a
partition on the flash drive. If there's no partition entry, it
probably means that the disk is a "superfloppy"—that is, that
it's being used unpartitioned.
- Type mount /dev/sdb1 /mnt/usb, changing /dev/sdb1 to your USB filesystem—change
the device letter as appropriate and change the partition number as
necessary or omit it entirely if the disk is used as a superfloppy. If
you get an error message, you may need to experiment or get help. If
you're using a disk other than Parted Magic, you may need to select a
different mount point (/mnt/usb in this procedure) or create
/mnt/usb by typing mkdir /mnt/usb.
- Type ls /mnt/usb to verify that the files
you placed on the USB flash drive are now accessible.
- Type cd
/mnt/usb/tianocore_uefi_duet_builds-tianocore_uefi_duet_installer,
changing the pathname if the DUET package you downloaded uses a
different one. (Tip: Linux shells support command completion, so
you can type a few characters and then press the Tab key to have the
shell complete a long command or filename.)
- Type sh ./duet-install -m -s
/mnt/usb/syslinux-405/mbr /dev/sda1, changing the path to the
SYSLINUX binaries (from /mnt/usb/syslinux-405) and to your EFI
System Partition (from /dev/sda1) as necessary. The
-m option tells the script to install SYSLINUX, and
-s tells it where the SYSLINUX binaries exist.
- The installation script displays some information about what it's
installing and where it's found things such as the target disk. Review
this information and, if it seems OK, type Y at the
Do you want to continue (Y/N)? prompt.
If the duet-install script completes without complaint, chances
are it's installed DUET on your hard disk. You can now remove the
optical disc from the drive and either type reboot or
select Logout from the menu that pops up from the lower-left corner of the
screen to reboot the computer.
Using DUET
When you reboot, the computer should go through it's usual BIOS startup
displays. If you installed to a USB flash drive, you may have to press F10,
F12, or some other function key to get to the boot device selection screen
to boot from that drive rather than from your hard disk. When this is done,
you should see a display that reads WELCOME TO EFI WORLD and/or a
Tianocore logo. You're likely to then see a UEFI menu, similar to the one
shown in Figure 6. (I'm cheating here a bit, since this screen shot shows a
VirtualBox UEFI menu, but the DUET menu is very similar.)
Figure 6. The main DUET screen shows a number of
boot and device management menus.
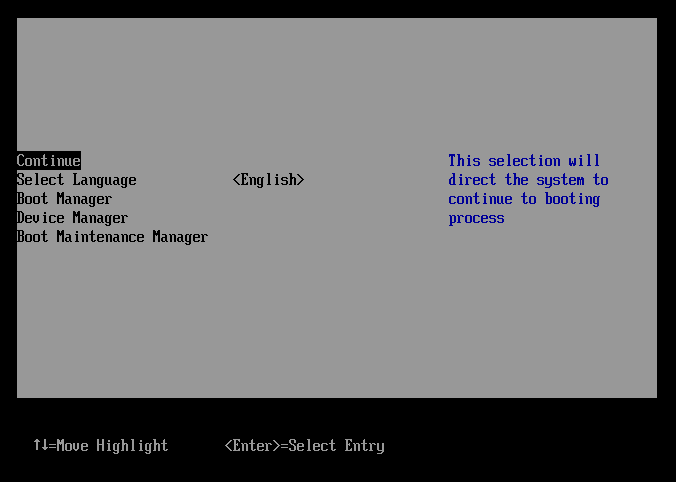
This menu is confusing to the uninitiated, but the most important item
for the moment is the Boot Maintenance Manager. Select this item, followed
by Boot From File on the next screen, and you'll see a list of disk
devices, as shown in Figure 7. Select one of these and you'll be able to
browse through your disk filesystems to locate and run EFI programs and
boot loaders, which have .efi filename extensions.
Figure 7. UEFI identifies disks using long codes.

If all you've got is a DUET installation, you won't be able to do
much, since all it comes with is a shell (command line) program and a small
number of utilities. In practice, you'll want to install an OS, and for
that you'll need an OS installer. If you're lucky, DUET will boot your
OS installer when you insert its installation CD, DVD, or USB flash drive
and reboot back into DUET. If you're less lucky, you'll need to copy
some or all of the installer's files to a USB flash drive or a hard disk
partition.
Installing Windows Under DUET
Theoretically, Windows should install directly from its installation DVD
under DUET. In practice, it hasn't worked for me. You might want to
try it, but if it fails, you'll need to copy the Windows boot files from
the installation DVD to a USB flash drive or hard disk partition. In any
event, you'll need a 64-bit retail Windows installation disc (I've tested
only with Windows 7). I've been unsuccessful in getting an OEM recovery
disc (the type you create by burning the ~20 GB recovery partition to DVD)
to work for this purpose. This
site provides download links for various Windows 7 versions. My
understanding is that downloading and using such an image is legal provided
you've got a valid Windows license key—but you must download the same
version you own (for instance, Windows 7 Home Premium 64-bit). If your
computer came with Windows 7 pre-installed, the key should be on a sticker
on the case or in a manual. (It's on the bottom of my laptop, for
instance.)
One important pre-installation note: Windows is fussy about the EFI
System Partition. Most importantly, Windows requires that this partition
use a FAT32 filesystem. The procedure described earlier, in "Installing DUET," creates a suitable
partition. If Windows complains that partitions are not in the correct
order, or that it can't find the EFI System Partition when one is clearly
present, these are symptoms that you've got a FAT16 ESP. If this happens,
you may need to re-create the ESP and ensure that it's FAT32.
Alternatively, you could forego creating the ESP yourself, use DUET on
a bootable USB flash drive, let Windows create the ESP, and then install
DUET to the hard disk after Windows is done installing.
With the necessary tools in hand, you should follow these steps
(skipping to step #4 if you want to try booting the Windows installation
disc directly):
- Using any available computer, copy all the files from the UDF side of
your Windows installation disc to a USB flash drive. (The Windows 7
installation disc has both ISO-9660 and UDF filesystems on it. Thus,
you may need to adjust mount options to access the UDF side. The
ISO-9660 side holds only a text file stating that you need to have UDF
support to access the disc.)
- Extract the 1/Windows/Boot/EFI/bootmgfw.efi file from the
SOURCES/install.wim file on the Windows installation disc.
This file is in Windows
Imaging Format, which you can extract with 7zip. (I used 7z under
Linux.)
- Place the bootmgfw.efi file on the USB flash drive with your
Windows installation files.
- Boot the target computer into DUET.
- Using the Boot Maintenance Manager, launch the bootmgfw.efi
file. The Windows installer should start up. You can proceed with
installation in the normal fashion; everything will be installed from
the USB flash drive. I don't describe Windows installation in detail on
this page. Microsoft has a Web
page on the subject. A few quirks remain, though....
- Partway through the installation, the computer will reboot. If Windows
doesn't start automatically, you must use the UEFI Boot Maintenance
Manager to select the EFI/Microsoft/Boot/bootmgfw.efi file
from your ESP. This will launch the nearly-complete on-disk Windows
system to complete the installation.
- On subsequent boots, you may need to select the same
EFI/Microsoft/Boot/bootmgfw.efi file when you want to boot
Windows. (See the "Managing the Boot Process"
section for information on how to select a default boot loader.) If
you're lucky, though, Windows might boot automatically.
If you've got a working Windows installation on an MBR disk and you want
to convert to GPT and UEFI booting, you can do so, but the process is a bit
awkward. See this
wiki entry or this
thread on the InsanelyMac forum for details.
Installing Linux Under DUET
In principle, Linux installation under DUET works like Windows
installation. I've had some luck booting some Linux distributions directly
from optical discs, but only on certain computers—as noted earlier,
my main DUET test system has an optical drive that DUET can't
detect. Therefore, the following instructions emphasize installation from
USB flash drives. You can try using an optical disc, though. I begin with
some comments common to all distributions. Notes on Fedora, OpenSUSE, and Ubuntu follow....
Common Linux Installation
Notes
The libparted library, which is used by most Linux distributions as part
of their partitioning procedure, has a bug that causes it to clear GPT
attribute data whenever a partition table is modified. The SYSLINUX boot
loader relies on the Legacy BIOS Bootable attribute to be set, so when the
installer reboots, the computer will become unbootable, at least in DUET
mode. The solution is fairly simple, but tedious because it requires
booting Parted Magic to make a very simple change:
- Boot the computer using Parted Magic (or to another Linux distribution
in BIOS mode).
- Open an LXTerminal window.
- Type sgdisk -A 1:set:2 /dev/sda, changing
1 to the partition number of your ESP and
/dev/sda to the disk device. Keep 2 as a
constant; that's the position of the Legacy BIOS Bootable bit in the
attributes field. Be sure to pass an uppercase -A
option; a lowercase -a won't have the desired effect.
- Reboot.
Alternatively, you could install another MBR-resident boot loader, such
as GRUB or LILO. These boot loaders don't rely on the Legacy BIOS Bootable
flag, which makes them less susceptible to libparted's damage.
Linux switches easily between BIOS and UEFI boot modes. Therefore, it
may be easier to install the OS in BIOS mode and then reconfigure it to
boot in UEFI mode, if desired, rather than to install directly in UEFI
mode. For some distributions, this may be your only practical choice. The
last I checked, for instance, Debian didn't support direct installation in
UEFI mode on x86-64 computers.
Installing Fedora 15 under
DUET
The procedure I used for installing Fedora 16 was as follows:
- Download a Fedora 16 64-bit DVD image and burn a DVD from it. (The
smaller CD image might work, too.)
- If you use DUET 2.3 on your hard disk, prepare a USB flash drive
with DUET version 2.1 (by using the -edk option to
duet-install, as described in the sidebar by step #27 in the
DUET installation procedure). This step might not always be
necessary, though. I needed to do it because I had problems with
Fedora's GRUB under DUET 2.3, but that might have been a
system-specific issue.
- Copy the EFI and images directories from the DVD to
a FAT partition on a USB flash drive. Caution: The EFI
directory includes a file named EFI/BOOT/BOOTX64.efi, which is
a name that's often given to a default boot item. If you've installed
another OS, you should be sure to not use the ESP as a target
partition for these files, lest you overwrite the default boot loader.
- Boot the target computer using DUET and enter the UEFI menu.
- Insert the Fedora 15 DVD into the drive.
- Select the EFI/BOOT/BOOTX64.efi file from the USB flash drive.
If your system can boot from an optical disc, you might be able to
forego step #3. When you boot DUET with the Fedora disc in the drive,
it will then start up directly into the Fedora installer. If you need to
use this hybrid flash drive/DVD installation, the the kernel will load from
the flash drive, but most of the files will install from the DVD. If you
omit the DVD, the installation will actually complete, but the installer
will require a network connection and will download everything from the
Internet. Once launched, the installation process procedes much as it would
on a BIOS-based computer. A complication develops when the computer reboots
near the end of the process, though, because of the libparted bug described
earlier, in "Common Linux Installation Notes."
Restoring the Legacy BIOS Bootable attribute fixes the problem and you can
reboot DUET.
You might now need to select the efi/redhat/grub.efi item in
the ESP when you reboot. When you do, GRUB should appear and boot your
Fedora kernel, which will then take you to the final steps of Fedora
setup. On my system, Fedora's installer did not detect my earlier Windows
installation, so I had to add it to the GRUB configuration—but this
didn't work as well as I'd hoped, as noted later, in "Managing the Boot Process."
Installing OpenSUSE 12.1 under
DUET
I've done one test installation of OpenSUSE 12.1 under DUET. The
procedure is a bit more tedious than is the Fedora 16 installation
procedure, but it's much better than was the procedure for OpenSUSE 11.4,
which was downright painful. Nonetheless, you might consider installing in
BIOS mode and then converting to a UEFI boot. If you care to try installing
directly in UEFI mode, here's how:
- Download and burn an OpenSUSE 12.1 DVD. If DUET detects and boots
your optical disc, you can boot it and skip ahead to step #7.
- The boot/x86_64/efi file on the installation disc is actually
a disk image containing EFI boot files that you must extract if your
system can't boot from the optical disc. Under Linux, mount -o loop /mnt/cdrom/boot/x86_64/efi
/mnt/floppy will do the trick, provided the disc is mounted at
/mnt/cdrom and you have an empty /mnt/floppy mount
point.
- Mount a FAT USB flash drive and copy the contents of
/mnt/floppy to it. The USB flash drive should now have an
efi/boot directory with four files.
- Boot your target computer into DUET's menus.
- Insert the USB flash drive and the OpenSUSE 11.4 DVD into the target
computer.
- Using the UEFI boot manager, boot the efi/boot/bootx64.efi
file on the USB flash drive. The OpenSUSE installer should start up. I
won't describe every detail of the installation procedure, but there
are a few wrinkles that require explanation....
- The Suggested Partitioning screen recommends creating a new "boot
volume" (aka an ESP), which is unnecessary if you've already created
one as described earlier. Therefore, you should select the Edit
Partition Setup option, delete the duplicate ESP, and reconfigure the
installer to mount the existing one at /boot/efi. When you
continue, this should result in a warning to the effect that you're
installing to a partition that's not being formatted. Tell it to
proceed.
- Unfortunately, OpenSUSE, like Fedora, clears the Legacy BIOS Bootable
flag from the ESP, so you must re-instate it, as described in the "Common Linux Installation Notes" section.
- When you reboot, you should use the UEFI boot loader to boot
efi/SuSE/elilo.efi This launches ELILO, which in turn boots
OpenSUSE. It will perform a few final installation tasks, then show a
login screen.
Installing Ubuntu under
DUET
Don't even think about installing Ubuntu 11.10 and earlier in UEFI mode.
I ran into two very serious problems when I attempted to do so:
- Ubuntu uses GRUB 2 to boot the installer from the installation medium,
and I had serious problems getting this to work. It hung before
displaying a GRUB menu when I used DUET 2.3, and under 2.1, it
behaved erratically—sometimes it would hang, other times it would
give me an emergency grub> prompt, and still other times it
would show me a normal GRUB menu but the installer would hang while
loading. This problem might have been at least partly hardware- or
BIOS-specific though; you might have better luck. I eventually worked
around it by adding ELILO to my installation flash drive, but the next
problem is worse....
- Unbidden, Ubuntu 11.04 and 11.10 replaced my valid FAT32 ESP with a
FAT16 ESP. This erased DUET and my ability to boot Windows and
Fedora. (I hadn't yet installed OpenSUSE.) Since Windows insists on
having a FAT32 ESP, installing Ubuntu first may be a bit safer, but not
all that much better—any way you slice it, you'll have to undo
damage done by Ubuntu's installer. This bug is documented here,
if you care to follow it.
The second of these bugs is reportedly fixed in Ubuntu 12.04, which is
due out any day now, as I write, but I haven't attempted to install its
betas on a DUET system. The GRUB issue might well also be fixed. If
so, Ubuntu should install fairly cleanly if DUET can read your optical
disc or if you use a UEFI-bootable USB flash drive as an installation
medium. If you download a disc image and it doesn't boot directly, you may
need to create a mixed DVD/USB flash drive solution similar to the ones
described for Fedora and OpenSUSE.
Until then, or if you have problems installing Ubuntu in UEFI mode, you
may want to install it in BIOS mode and then convert it to use DUET.
When you install in BIOS mode, be sure to create a BIOS Boot
Partition or GRUB might not install. GRUB will also overwrite SYSLINUX
in the MBR, so you'll need to create a GRUB entry for your ESP, as
described in the "Managing the Boot Process"
section. If you want to preserve SYSLINUX in the MBR, you can try
installing GRUB to the Ubuntu root (/) partition or to a non-boot
disk (say, another of those USB flash drives I assume you have lying
around), but I make no promises that this will work.
After installing in BIOS mode, you can install a UEFI boot loader, as
described in the "Managing the Boot Process"
section. Ubuntu has packages for GRUB 2 in EFI mode (grub-efi),
ELILO (elilo), and rEFIt (refit). Of course, you can also
install any of these from non-Ubuntu sources. Note that if you install
the grub-efi package, it will uninstall grub-pc, which is
required for BIOS-style booting, so if GRUB 2 is now in charge of your MBR
and you want to use GRUB 2 for UEFI-style booting, too, you should install
GRUB 2 in some other way.
Managing the Boot Process
Under UEFI, the distinction between two types of boot programs is
important:
- Boot managers—These programs present a menu of options
or enable users to type commands to boot a particular OS. They don't
actually load an OS kernel, though; they just interact with the user
and kick the process down the path a bit.
- Boot loaders—These programs load an OS kernel and hand off
control of the computer to that kernel.
Popular boot programs in Linux (LILO, GRUB Legacy, and GRUB 2) perform
both of these tasks, so many Linux users (myself included) haven't always
clearly distinguished between these two functions. Under UEFI, though, the
firmware itself includes—or can include—a boot manager.
Boot loaders can therefore be much simpler, and some of them are. Others
(particularly UEFI variants of BIOS boot loaders) incorporate both types of
function.
A further twist on all this is that, although EFI implementations
can include good boot managers, many of them don't. DUET's
Boot Maintenance Manager is an example of a relatively crude UEFI boot
manager—but even it is really quite capable compared to some firmware
implementations' boot managers. Gigabyte's Hybrid EFI, for
instance, provides no options beyond selecting a physical boot device, like
a regular BIOS does.
OS-specific boot loaders and independent boot managers typically appear
in directories called EFI/vendorname, where
vendorname is the OS developer's name, such as Microsoft
for Microsoft or redhat for Fedora. Because the line between boot
managers and boot loaders can be a blurry one, I summarize them all in one
list:
- Microsoft's boot loader—This boot loader seems to be quite
simple, but there may be hidden power I don't know about. As far as I
know, it simply boots Windows. This is fine if Windows is your only OS,
but if you multi-boot, you'll want to use a separate boot manager to
select your OS, and have that boot manager chain-load to this one. The
EasyBCD tool is a popular
adjunct to the Windows boot loader; however, it doesn't seem to
understand UEFI.
- The
Linux kernel with EFI stub support—Beginning with version
3.3.0, the Linux kernel has included its own EFI boot loader. In my
experience, this is the most reliable EFI boot loader for Linux, but
its newness means that it's not yet supported by most distributions.
(Fedora 16 now includes kernels with this feature, but the distribution
doesn't support booting via this method.) You'll need to install your
kernels where the EFI can read them, which may mean a bigger ESP than
your distribution sets up by default. If you're using a kernel that
includes this boot loader, though, installing the rEFInd boot manager
(described shortly) can be a good way to manage your boot process.
- The EFI Linux
Loader (ELILO)—This is the oldest of the Linux EFI boot
loaders. In my opinion it second only to the kernel's EFI stub support
in reliability and ease of configuration. ELILO can't chainload to
another EFI boot loader—that is, it's only a boot manager among
Linux kernels. Thus, if you use it and want to dual-boot with a
non-Linux OS you'll need to use another boot manager to select your OS.
Also, ELILO requires that your kernel be on the ESP or another
partition that the firmware can read. This can require a larger ESP
than you might like, particularly if you install several Linux
distributions or like to keep several kernels on hand.
- GRUB
Legacy—This older version of GRUB doesn't normally
support UEFI, but Fedora ships with a heavily modified version that
does. It supports chainloading to other .efi files,
making this program both a boot manager and a Linux boot loader. I've
had problems getting it to reliably chainload, though, so its utility
as a boot manager is questionable. It can boot a Linux kernel from most
Linux filesystems (but not from within an LVM or Linux RAID setup), so
it can be used even with a small ESP.
- The Grand Unified
Bootloader (GRUB) 2—This boot loader is flexible and
powerful, but its configuration file is complex and trouble-prone on
UEFI systems, in my experience. I've had the best luck with it under
VirtualBox's UEFI implementation; on both a real Intel UEFI system and
DUET, it's flaky and unreliable. It tends to be more reliable when
built from source and installed entirely on the ESP than when installed
from the binary packages that Ubuntu provides. GRUB 2 can boot a kernel
from a Linux partition, so its use doesn't add much to the space
requirements of the ESP. It can also redirect the boot process to
another .efi file.
- rEFIt—This
boot manager originated in the Mac world, and it's got a few bugs on
UEFI systems. (Intel-based Macs use the older EFI 1.x, whereas
non-Mac UEFI-based PCs use the newer UEFI 2.x.) It's strictly a
boot manager, not a boot loader. Thus, it can be a good choice for
choosing between Windows and Linux, particularly if you prefer ELILO as
your Linux boot loader. Beware, though: Most rEFIt binaries use a
hybrid 32/64-bit format that works fine on Macs but that don't work
with DUET. Ubuntu and Debian both ship with rEFIt binaries that
work on UEFI systems; and I've made a version with a couple of patches
available here.
Because of display problems when used in the default GUI mode, I prefer
to use rEFIt in text mode, which you can activate by uncommenting the
textonly line in its configuration file. As I write, the last
update to rEFIt was released in March of 2010 (just over two years
ago), so it appears that it's been abandoned.
- rEFInd—I
created this program because of the apparent abandonment of rEFIt.
rEFInd is in fact a fork of rEFIt, to take up where its development
left off. Most importantly, rEFInd fixes many of rEFIt's UEFI bugs and
adds features to improve its configurability and usefulness to Linux
users. It includes features that help it detect and boot Linux kernels
that incorporate the new EFI stub loader feature.
If you're using a boot loader that doesn't include its own filesystem
drivers, such as ELILO or the Linux kernel's EFI stub loader, you'll need
to place that boot loader program and its support files on a partition that
the EFI can read. This can increase the size requirements of the ESP. One
way around this is to use EFI drivers, which expand the range of
filesystems that the EFI can read. This can be a particularly handy trick
with the Linux kernel's EFI stub loader. See the Using EFI Drivers
page of the rEFInd documentation for more details on this approach. (Both
rEFIt and rEFInd can automatically load EFI drivers, although some specific
builds lack this ability.)
In theory, there are various ways to select which boot manager or boot
loader runs by default:
- You can put a boot loader in the EFI/boot directory and
give it the name bootx64.efi.
- You can write a startup script called startup.nsh and place it
in the root of the ESP. A one-line script that simply launches your
desired boot loader can work well.
- You can use the UEFI menu's Boot Options menu under the Boot
Maintenance Manager to add, delete, and manage entries in the UEFI's
own boot manager, which you can access from the Boot Manager menu.
- You can use the Linux efibootmgr
program to manage UEFI boot manager options, including setting a
default. This doesn't always seem to work quite right, though.
Unfortunately, the last two methods don't work with DUET in
practice, although they (or their equivalents) do work with most UEFI
implementations built into motherboards. In practice, the best way to
launch your chosen boot manager is generally to name it
EFI/boot/bootx64.efi.
If you want to boot both Windows and Linux on a GPT disk, you have two
choices: You can boot both using DUET or you can boot Windows using
DUET and boot Linux in BIOS mode. The latter is likely to be slightly
faster and is simpler in many ways. Booting Linux via DUET offers few
practical advantages. The most compelling reason might be that you can use
rEFIt or rEFInd, which provide flashier graphical boot menus than do LILO
and GRUB. If you use rEFInd with 3.3.0 or later kernels, kernel management
tasks can also be simpler. Still, these advantages are unlikely to
outweigh the greater complexity of the initial setup or the extra boot time
it takes to launch DUET.
With that in mind, You may want to consider creating a slightly
different configuration than the one described on this page. The
instructions presented earlier, under "Installing DUET," configure the computer
to always boot in UEFI mode—at least, when the computer boots from
its hard disk. If, however, you install a standard BIOS-mode Linux boot
loader, such as LILO (not ELILO), GRUB Legacy, or GRUB 2, to the disk's
MBR, that boot loader will replace SYSLINUX. You can then add an entry to
the MBR boot loader to chainload to BootDuet, and therefore to DUET.
The result will be an initial boot menu that gives you the option of
launching Linux in BIOS mode or DUET; if you select the latter option,
you can configure it to launch Windows directly or to launch another UEFI
boot loader. In fact, it's possible to boot the same Linux distribution
both ways without any reconfiguration; you just select whichever set of
boot loader options are required to boot in the desired way!
An example of a GRUB Legacy (/boot/grub/menu.lst or
/boot/grub/grub.conf entry to boot DUET from an ESP on the
first partition of the first disk is:
title DUET
    rootnoverify (hd0,0)
    chainloader +1
Note, however, that not all versions of GRUB Legacy support GPT; you
need a version that's been patched with GPT support. (Most distributions
ship with such patched versions.) An equivalent configuration for GRUB 2
(in /boot/grub/grub.cfg, although placement in
/etc/grub.d/40_custom and then regenerating grub.cfg is
preferable) looks like this:
menuentry "DUET" {
    set root=(hd0,1)
    chainloader +1
}
Note that it's possible to create multiple DUET installations and
boot them independently. This might be handy if you need to use version 2.1
for some purposes and 2.3 for others. You might also be able to install
related utilities, such as DUET-based Hackintosh boot loaders, to coexist
with the version described here; however, I've never attempted such a
configuration.
Troubleshooting Problems
DUET is still very much an experimental/hobbyist tool. I don't
recommend using this solution in a production environment, particularly not
if you lack the technical knowledge required to keep it working. The
software might not install and work correctly, and if it does, DUET
installations can be delicate, so you must be cautious about using and
reconfiguring them. Some things that can go wrong, and possible solutions,
include:
- As noted earlier, DUET works best on computers with Intel CPUs;
it fails to run, or runs poorly, on most computers with AMD CPUs. I
don't know the root cause of this problem, and unfortunately I lack a
solution.
- Sometimes one DUET version works when another one doesn't work.
The DUET package described on this page ships with both 2.1 and
2.3 implementations. The duet-install script installs the 2.3
implementation by default. This version is faster and more capable than
the 2.1 version, so it's generally preferable; however, if it crashes
your computer, you can give the 2.1 version a try. You'll need to use
duet-install to re-install the software, but this time pass
-edk along with the other options. (You don't need to
completely repartition the disk; just skip ahead to the
duet-install stage.) Note that the 2.1 version lacks support
for AHCI hard disk mode, so you may need to disable this support in
your BIOS. (I saw AHCI drivers in a Hackintosh XPC package, but I don't
have a link handy; and using such drivers would require loading them
from a non-AHCI disk such as a USB flash drive or a PATA disk.)
- DUET stores its settings in a file called Efivar.bin in
the ESP. If this file becomes corrupted, DUET may malfunction. In
such cases, deleting the file can solve the problem, at the expense of
removing customizations. You may also need to delete this file if you
install DUET on a USB flash drive and intend to move it from one
computer to another; the settings for one computer can cause another to
malfunction. The keyboard may be unresponsive on the second computer,
for instance, until this file is deleted.
- The GParted utility, used here to perform initial partitioning
operations, has the unfortunate habit of zeroing out GPT attribute
fields on all partitions whenever the tool makes modifications
to any partition. This is a problem because SYSLINUX relies on
one such field, the Legacy BIOS Bootable attribute, to identify which
partition should be booted. Thus, if you use GParted on a working disk,
it may stop working. One fix when this problem occurs is described
earlier: In a Linux installation, type sgdisk -A
1:set:2 /dev/sda, changing 1 to the
partition number of your ESP and /dev/sda to the disk
device. Another solution is to replace SYSLINUX with GRUB or some other
boot loader that doesn't rely on partition attribute flags. You can
also avoid the problem by using GPT fdisk (gdisk,
cgdisk, and sgdisk) for partitioning and
text-mode tools such as mkfs for filesystem maintenance rather
than rely on libparted-based tools such as GParted.
- If you use GParted or some other utility to move the partition to which
BootDuet is installed, it may stop working. This is because the program
relies on a hard-coded value of the partition's location on the disk in
the FAT filesystem data. If the partitioning tool doesn't update this
field, BootDuet will fail. You can either run duet-install to
re-install everything (which is easy but overkill) or adjust the
settings, as described in BootDuet's own documentation.
- I haven't yet tracked down the precise cause, but I've seen DUET
fail to boot when a GPT disk's protective MBR isn't to its liking.
Replacing the protective MBR fixes this problem. (The gdisk program can
do this; use the n option on the experts' menu.)
- This isn't a DUET issue specifically, but because Linux and Windows use
the same partition type GUID to identify their filesystem partitions,
Windows will see Linux filesystem partitions as unformatted Windows
partitions; they'll show up in the Computer window and, if you click
them, Windows will prompt you to format them. This is a disaster
waiting to happen. I recommend you change the type code of Linux
filesystem partitions using gdisk. See this page
for more on this issue and solutions to it. The simplest of these
solutions is to use a recent version of gdisk, which provides
a Linux-specific partition type code (8300).
Additional Resources
- My page on EFI boot
loaders for Linux provides much more information on this topic.
- My Linux on UEFI: A
Quick Installation Guide page provides helpful tips on how to
install Linux on EFI-based systems.
- The DUET
source download page may be of interest if you want to try your
hand at building DUET yourself.
- This
site provides a set of instructions for building DUET under
Windows.
- My GPT fdisk (gdisk,
cgdisk, and sgdisk) documentation provides
information on these partitioning tools, as well as on GPT in general.
- The "Windows
x64 BIOS to UEFI" article describes how to switch to UEFI boot mode
without reinstalling.
- This
forum thread discusses development of BootDuet and of DUET.
(It's the original genesis of the preceding wiki article, too.)
- Several additional UEFI links appear here.
- Intel has a Web
page that summarizes UEFI shell script commands.
- The Wikipedia article on
UEFI provides a good introduction to what UEFI is and how it
interacts with other software and hardware on the computer.
- Microsoft's Windows
and GPT FAQ is focused on GPT, but often touches on UEFI's
interactions with GPT. Note that it's overly pessimistic about some
topics, such as the possibility of doing MBR-to-GPT conversions without
losing data, since they don't provide tools with the functionality of
GPT fdisk.
- Microsoft's UEFI and
Windows page provides a link to a .docx file with basic
information on UEFI and how Windows interacts with it.
- iBoot
is another derivative of DUET; it's intended as a Hackintosh boot
loader.
- This
page describes the EFI boot process.
- This
page describes the boot process used by Windows Vista and Windows
7, with an emphasis on the post-firmware part of the process.
- Clover is
a Hackintosh boot loader for BIOS-based computers that includes, among
other things, its own build of DUET and a fork of the rEFIt boot manager. Binaries
aren't available from the Clover Sourceforge page, but you can obtain
them as links in this
forum thread.
- Like Clover, XPC is a
Hackintosh boot loader built atop DUET. It's an earlier effort, but I
know less about it.
If you have problems with or comments about this web page, please
e-mail me at
rodsmith@rodsbooks.com. Thanks.
Return to my main Web page.